Today is my husband’s birthday and he does not like cake. I asked him what he would like for his bday dessert and he said “Oooo peach cobbler!” Great, except we are in the middle of a pandemic and peaches are not in season. Whomp whomp.
So the great thing about this recipe is it combines canned peaches, some pantry staples and a little spice from cinnamon and nutmeg. I had the ingredients to make oatmeal cookies so I decided to attempt a cookie topped cobbler!
Peach filling
Dollops of cookie dough
Golden brown
Spiced Oatmeal Cookie Peach Cobbler
Cinnamon and nutmeg compliment this oatmeal cookie topped peach cobbler
I always recommend reading the entire recipe before you begin
Ingredients
Cookie Topping
-½ cup sugar
-½ cup brown sugar
-½ cup (1 stick) unsalted butter, softened
-1 tsp cinnamon
-¼ tsp nutmeg
-2 tsp vanilla
-1 egg
-1 cup AP flour
-1 cup old-fashioned oats
-½ tsp baking powder
-½ tsp salt
Peach Filling
-3 15oz cans sliced peaches in juice (drained)
-2 TBSP sugar
-1 TBSp brown sugar
-1 TBSP AP flour
-½ tsp cinnamon
-⅛ tsp nutmeg
-½ TBSP lemon juice
Directions
In the bowl of a stand mixer on medium speed, cream together softened butter, sugar and brown sugar until light and fluffy.
Add cinnamon, nutmeg, vanilla and egg. Beat until combined, scraping sides down if necessary.
In a medium bowl, stir together flour, oats, baking powder and salt. Add to mixer on low speed until incorporated.
Cover bowl with plastic wrap and refrigerate for 30 minutes. Preheat oven to 350° for 30 minutes while making filling.
Combine all ingredients for Peach Filling in a medium bowl until peaches are evenly coated.
Spray a 9” pie dish with non-stick spray and pour filling int the bottom.
Once topping has chilled 30 minutes, drop large spoonfuls on top of filling until the top is covered.
Bake for 35-40 minutes, until top is lightly golden brown and bubbly.
Let cool on a wire cooling rack before serving. Enjoy with vanilla bean ice cream!
About a month ago I received a text from a friend challenging me to make him a “plaited loaf” of my choosing with a lot of words that referenced our shared love of The Great British Baking Show.
I was lucky to grow up with a close neighborhood friend who was raised Jewish and always invited me over for holidays, which meant amazing food. Her mom taught us to make Latkes and we would play games and sing songs, but I never remembered seeing anyone make Challah. We definitely ate it, but perhaps it was store bought? I have always been slightly nervous to attempt it, but this challenge gave me the push.
I have been obsessed with making garlic bread from my fresh Sourdough, so this Roasted Garlic and Rosemary take on Challah should satisfy all the garlic lovers! I happen to be a hairstylist, so braiding is sort of a gift I have. If you don’t feel comfortable braiding, tie three strings together and practice a 3-strand braid before attempting with dough. Good luck!
My husband loves lemon bars but I have personally never been a big fan of lemon in desserts because it can be a bit sharp. I had a bag of Cara Cara oranges that needed to be used up so I decided to try to make a lemon bar recipe that would be a bit more salty and less tart.
I love the results and the gorgeous color from these special little oranges! You could definitely use standard navel oranges but it may be a tad more sweet. These have a lovely buttery crust that reminds me of a flaky Blondie with fresh orange jam on top. Delicious!
Cara Cara Orange Bars
A seasonal, less-sweet take on the classic lemon bar
I always recommend reading the entire recipe before you begin
Ingredients
Crust
2 cups all purpose flour
½ cup (1 stick) salted butter, melted
½ cup powdered sugar
½ tsp vanilla extract
¼ tsp salt
Filling
4 eggs, lightly beaten
5 TBSP (2.5 oz) Cara Cara orange juice
2 tsp orange zest
1 cup sugar
Directions
Preheat oven to 350°, spray a 9″x13″ glass pan with baking spray or grease with butter.
In a medium bowl, sift flour and powdered sugar together. Add salt, vanilla extract and melted butter. Use a fork to gently mix until just combined to create a flaky crust.
Use fingers or silicone spatula to press mixture evenly into pan.
Bake 20 minutes or until the edges of the crust begin to turn light brown.
While crust bakes, prepare mixer with whisk attachment. Whisk together sugar, eggs, orange juice and orange zest until well blended.
Once crust is done, remove from the oven and pour filling mixture on top. Bake 15 minutes before loosely tenting with foil to avoid burning. Bake an additional 15 minutes.
Remove from oven and place on a wire cooling rack. Once completely cooled, Dust top with powdered sugar.
I love browned butter in pretty much any recipe that would normally use melted butter. I set out to make my own favorite chocolate chip cookies and knew I had to use browned butter for the perfect salty/sweet result. I have done this recipe with all different chips including: milk chocolate, semi-sweet, dark and even a combo of white chocolate chips with dried cranberries!
*Note: I definitely recommend weighing your sugar and flour in grams for this recipe. I have tried both with a measuring cup and a digital scale and the grams always turn out perfectly. If you don’t have a digital scale, don’t pack the sugar and flour down tight*
Browned Butter Brown Sugar Chocolate Chip Cookies
An intoxicating cookie that hits both salty and sweet notes.
I always recommend reading the entire recipe before you begin
Ingredients
1 cup unsalted butter (226g)
1 ½ cups brown sugar (320g)
1 large egg+1 egg yolk
1 TBSP vanilla extract
3 cups all purpose flour (360g)
1 tsp baking soda
¾ tsp salt
10 oz package frozen dark chocolate chips (or whatever chips you prefer)
Directions
Preheat oven to 375°. Line baking sheets with silicone mats or parchment paper.
Brown butter in a shallow pan on medium-low heat, stirring occasionally & watching closely. The butter is ready when the milk solids start to turn golden brown and smell similar to caramel.
Add brown sugar to a mixing bowl and pour browned butter over and stir to combine. Let stand 5 minutes to cool.
Lightly whisk egg and egg yolk and add to the sugar and butter mixture.
Add vanilla extract stir to combine.
Sift flour, baking soda and salt into the wet ingredients and gently fold in.
Add frozen chocolate chips and fold until just combined.
Scoop 1-1 ½ TBSPs of dough onto lined cookie sheet. Bake for 7-9 minutes or until edges just start to brown.
Let cool on sheet 5 minutes before transferring to a wire cooling rack.
Enjoy!
Here is the version I made with White Chocolate and Dried cranberries. I used 5oz White Chocolate Chips and 5oz Dried Cranberries. The saltiness from the browned butter really balanced the sweetness of the White Chocolate perfectly.
My go-to are these 53% Cacao Dark Chocolate Chips for the recipe above. Have fun with whatever chips or mix-ins sound good to you!
Since I was 3 years old I have been in the kitchen baking. From pasties to sticky buns, cookies to cakes, I have always enjoyed the process of baking. I find the exact measurements and timelines to be incredibly comforting. Something to rely on. Now bread making on the other hand, has always seemed like a science I could never grasp. Some sort of magical club of people that could master this ancient art.
After recently watching far too much Great British Baking Show, I was inspired to give making sourdough from scratch a try. I knew I wanted to make everything by hand to enjoy the lengthy progression. Being green to this approach, I reached out to some friends that bake bread regularly and they suggested I get my hands on the Tartine Bread book and a small amount of starter from Breadtopia. Since then, I have looked to Instagram, YouTube and Pinterest for additional inspiration and methods. I have done my best to come up with a consistent process that others can follow!
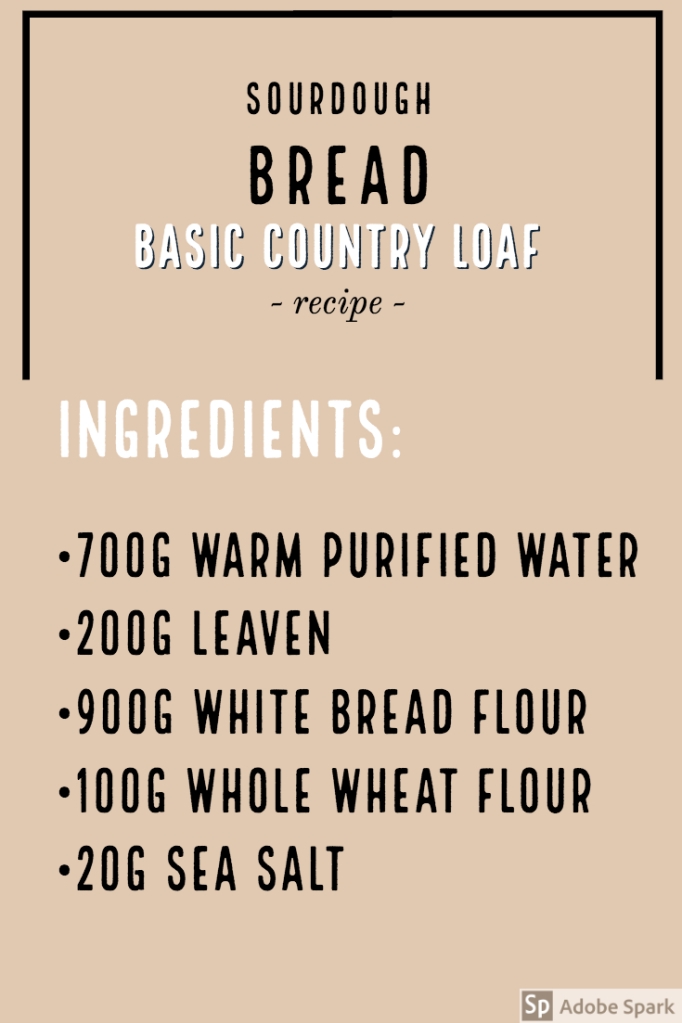
So once you have an active starter (either homemade, gifted or purchased) you can start to consistently bake on your own schedule. I typically bake once a week on a Monday evening which means I start the process the day before on Sunday. Since I have those two days off it gives me enough time and freedom to get a nice long fermentation while building strength in the dough. I highly recommend purchasing a digital kitchen scale that has an option for grams, from this point on I will be talking about everything in terms of grams. I got one for $30 at Target or you can find them all over Amazon.
Now I keep my starter in the fridge, after I’ve fed it, for a week in between bakes. I keep it in a mason jar with plastic wrap loosely on top with a rubber band marking where the starter sits when I put it in the fridge so I can see how much it grows. So before I start the process of making my loaves, I will remove it from the fridge and feed it a blend of 50/50 whole wheat flour and bread flour (usually 50g total, so 25g of each flour) and 50g warm purified water (I typically use water that is between 75-80 degrees depending on how cold my kitchen is). I then stir it all together well with a butter knife, loosely cover with plastic wrap again and leave out on my counter. I like to feed my starter like this at least once before a bake until the starter smells sweet and slightly ripe or acidic.
Here is the basic recipe that I use in this post:
Step 1: Leaven. Sunday night I will remove a full TBSP of starter and put that into a tall plastic beaker so it has room to grow, I then add 100g of my 50/50 flour mix and 100g warm water, mix, cover loosely with plastic or an open Ziploc bag (see below) and leave overnight. This is your leaven. For this recipe I make 2 loaves, so I will need 200g of leaven.
Step 2: Autolyse. The next morning I begin the process of mixing together whatever flour I am planning to use (bread, whole wheat, rye, spelt, etc) and warm water. I like to let this sit for 45 mins covered in plastic wrap before adding my leaven. I have found that this extra little step helps build more strength in my loaves. *I have also tried mixing the leaven, flour, water and salt at once and it resulted in flat loaves*
Flour and water mixed combined
Texture up close
Step 3: Adding the leaven and salt. After 45 mins, I measure out 200g of leaven and mix it in by hand by pinching it in all over the dough until fully incorporated. I cover the dough and let it rest for 45 minutes. After this resting period I slowly sprinkle in salt (20g for this recipe) while pinching to incorporate. Once salt has been fully worked into the dough, I perform one stretch and fold to create a nice ball. To do this you are going to lift the dough up from the middle and let each edge fold under itself, rotate your bowl and repeat in the other direction. Cover and let rest for 45 minutes.
Covered after stretch and fold
Step 4: Lamination. For this step you want to be sure you have a large, clean work surface to spread the dough out on. I use a portion of my granite countertop for lamination and shaping. Use a water spray bottle (or flicks of water with your hands) to lightly wet the surface of the countertop and be sure to wet your hands. Pull dough out onto the surface and begin to spread it out into a flat rectangle with your damp hands. *This is the time to add any fillings to your dough like seeds, flavorings, etc.*
Dough spread into a thin rectangle
Once the dough is spread evenly, you will wet your hands again and lift the edge furthest away from you and fold over the middle in thirds. Now repeat the same action on the edge closest to you to cover the previous fold.
Fold towards you
Fold away from you
The dough will now look long and skinny. Fold the right edge over the middle, then the left side over that so you have a nice square shape.
Right side over middle
Left side folded over right
Gently form the squared off dough into a ball and cover for 45 minutes.
Rough ball shape before being covered
Step 5: Stretch and folds. After the 45 minute rest, perform another stretch and fold by lifting the dough from the middle and letting each edge fold under. Rotate the bowl and repeat in the other direction. You will do 3-4 of these every 45 minutes until the dough starts to look smooth on the surface.
Step 6: Bulk rise/ bulk fermentation. This step is completely hands off, but so very important. After your stretch and folds you will cover the dough and leave it undisturbed for 2 hours. This is when your dough’s strength, flavor and gluten structures are formed and should grow 30-50% in size.
Step 7: Preshape. After the bulk rise, I like to lightly sprinkle flour onto my surface using one of these. Using a dough scraper, pour the dough out onto the floured surface. Now you will want to use a bench knife to cut the dough in half (for this recipe because it is for 2 loaves). With floured hands, pull the edges into the middle until the dough resembles a ball shape. Flip the ball over and repeat with the other piece of dough. Cover with plastic and a tea towel for 20 minutes.
Step 8: Shaping. Uncover the dough balls and re-flour your hands. Now I found a video on instagram that PERFECTLY explains the shaping method that I prefer. So thank you to @nmuvu for this clip! Basically you want to fold on edge towards you, one away from you over the first and then pinch and criss-cross the “seam” shut like a zipper. I have found that this extra step creates a lot more oven spring and a more round final shape than just folding the dough over itself.
So at this stage you will want to decide whether you are going to bake within the next few hours, or retard the fermentation in the fridge (up to 36 hours). The benefit here is that slowing the final proof in the fridge helps to develop flavor and I have found I get a better oven spring and texture.
If using a banneton proofing basket I like to take the cloth liner off to get the ridges from the basket after the final proof. To prevent the dough from sticking, I spray a light layer of coconut oil spray inside the basket and dust the whole surface with rice flour (knock off the excess into the trash). If using a bowl, line bowl with a tea towel and dust with rice flour. Gently pick up the dough with floured hands and drop into either type of vessel seam side up.
If I am going to bake soon, I will leave the basket out with the cloth liner covering the top for 3-4 hours and bake from room temperature. If retarding in the fridge, I will sprinkle flour on the surface of the dough and fold the tea towel over and cover the bowl with plastic before placing in the fridge. *I do not like to put the banneton basket in the fridge because air will get in and dry out the surface of the dough*
Step 9: On your marks, get set, BAKE! Okay, you have made it this far, Great job. Now it will soon all be worth it when the warm smell of fresh bread wafts through your kitchen. I bake my bread in this Calphalon Dutch oven, but you can use any type of Dutch oven with a lid or a bread cloche. It is so important to have a lid so that the initial bake produces steam to help the bread rise beautifully.
Begin by placing your Dutch oven in a cold oven with the lid on. Set the temperature to 500°F for 30 minutes. Once the oven has preheated for 30 minutes, use oven mitts to CAREFULLY remove the Dutch oven and place on a safe surface. Remove the lid and set aside. I like to use a pastry brush to dust any excess flour off the top surface of the dough before flipping the bowl or basket upside down so the dough falls directly in the middle of the Dutch oven.
Using a very sharp knife or dough scoring tool, slash the dough with a single line or “X” to allow bread to rise more evenly in the oven. Cover the Dutch oven with lid and lower oven temperature to 450°F before placing the Dutch oven inside. Bake with lid on for 20 minutes. Remove lid from Dutch oven and bake uncovered for 20 minutes. Remove bread from oven and use a spatula to place onto a baking rack to cool. I wait at least an hour before cutting into my bread with a sharp, serrated knife.
Proved in banneton basket 3 hours
Crumb shot
Proved in fridge for 24 hours
I would like to say a special thanks to my husband, Andrew, for his constant encouragement and critiques. I would also like to thank my friends @edmakesbread & @jennygoycochea for always guiding me and holding my hand through this new journey (check out their instagrams for more inspo).
Thank you for reading through my sourdough process and I hope this is helpful to you! Look forward to more bread recipes and if you have any questions please comment and let me know, Happy Baking!
This year, I decided I would start making New Year’s resolutions that were actually attainable. I am sick of pretending I’m suddenly going to pick up running, go to the gym at 6am or change my lifestyle drastically with a new way of eating. I prefer to live by the, “everything in moderation” motto.
So this year I set out to make the best mac salad. Why? Well, because a Hawaiian restaurant by my house makes a really great one and I wanted to figure out what made it so amazing and different. Now, I am definitely not Hawaiian. I have been 3 times, but to be honest I never had a mac salad over there that stuck out to me like the place down the street. There is a tang and brightness that I could never put my finger on.
I researched a lot of recipes. Tried them a few variations. Had my friends, family and coworkers weigh in (very willing participants, by the way). After 5-6 attempts, I feel like this one is the right balance for what I like. Now, you can adjust, add and subtract a few things-BUT DO NOT SKIP THE APPLE CIDER VINEGAR!!! This is what I have found gives the mac a perfect texture and tang that balances the sweetness and mayo content.
This one has been made countless times since it won the taste test and it compliments so many dishes, but it is honestly so good on its own. Enjoy!
Perfect Macaroni Salad
A fresh, light, Italian-inspired pasta recipe perfect for a late summer dinner.
I always recommend reading the entire recipe before you begin
Ingredients
2 cups whole milk (divided)
1 ½ cups mayonnaise
1 TBSP brown sugar
1 tsp salt
½ tsp black pepper
1 lb elbow macaroni
½ cup cider vinegar
½ cup yellow onion (grated)
2 carrots (peeled and shredded)
1 celery (finely chopped)
Directions
In a small mixing bowl, whisk together 1 ½ cups milk, 1 cup mayonnaise, brown sugar, salt and pepper. Set aside.
In a large pot, bring 4 quarts of water to a rolling boil. Add pasta and 1 TBSP salt to the water and cook the pasta for 15 minutes. Until it’s fat and very soft. Drain pasta and pour it back into the dried pasta pot. Pour vinegar over pasta and stir until it’s evenly distributed and absorbed. Pour pasta into a bowl and cool for 10 minutes.
Add in the milk and mayonnaise mixture and stir until evenly combined. Let cool completely.
Add the grated onions, carrots, celery and remaining ½ cup milk and ½ cup mayonnaise to the pasta and mix until combined.
Cover and refrigerate for at least 1 hour and up to 2 days. Adjust salt & pepper to taste before serving!


")
")